

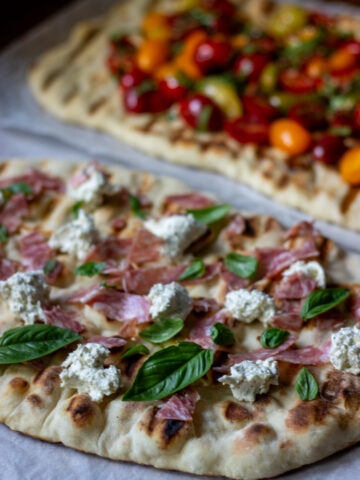
Detroit-style deep dish pizza at home with an (easy!) sourdough crust! This delivers all the most delicious parts of a deep dish pizza - the cheesy crust on the outer edge, the bubbly toppings, the crispy crust.
This can do a fast rise or a slow rise in the fridge, so you can make it on the same day, or make it ahead!

Okay, I want to know why more people aren't making Detroit-style pizza at home because it is the EASIEST. How is this such a well kept secret???
What makes it so easy? I'm glad you asked! There is no shaping involved. You just dump the dough in a pan, let it rise (which you can even do in your fridge!) and then assemble your toppings and bake it.
I first tried making a Detroit-style deep dish pizza in honor of the Lions making it to the playoffs(!!!!), and now I cannot stop making them.
My kids tell me this pizza is better than Jets. (Disclaimer: I am not telling you this is better than Jets. I think Jets has a secret ingredient in their pizza that the public doesn't know about that makes it unbelievably delicious. But this is darn close. And also I'm biased toward Jets because to me as the Dinner Maker getting Jets means someone else is making dinner and for an adult mom that is basically a snow day.)
Detroit-Style Pizza
If you're not familiar with Detroit-style pizza, your life is about to change.
It's pizza that's baked in a baking dish, so it has a really thick crust, but normal amounts of toppings. (This is different than a deep dish pizza, which has what I consider to be an outrageous amount of sauce/toppings).
What's so good about a Detroit-style pizza is that the pan is coated with oil before the dough goes in, so the outside of the crust is sort of fried as the pizza bakes, giving you a deliciously crispy pizza with crunchy, cheesy edges.
And you don't have to definitively choose if you like Detroit-style pizza better than every other kind of pizza in the world! You can like them all!

The Dough
I'd say the dough is THE MOST important part of a Detroit-style pizza, since it's a pizza that relies so heavily on its crust.
This is a really simple recipe using sourdough starter to leaven it. It's a high hydration dough, which gives you lots of bubbles in the crust, and also means you'll want to wet your hands before touching it to prevent sticking.
Kneading and a couple of rounds of stretch and folds help this dough to develop the gluten. Both are important!

The flour
I have the option of using bread flour or all purpose flour in the recipe card. I've done it both ways, and have made it with a combination of both flours before, and can say that they're all good!
Bread flour will give you a slightly chewier crust, all purpose flour will give you more of an airy crust, a combination will give you a little bit of both - I'd say use what you have or whatever you feel like.
The rise
After the stretch + folds, the dough gets transferred to an oiled pan to rise. You can do a quick (same-day) rise, or a longer rise (for pizza tomorrow!).
Quick rise - Can I even say "quick" when I'm talking about sourdough? Let the dough rise at room temperature for 6-7 hours, then proceed with making pizza.
Slow rise - After the 6-7 hours at room temperature, transfer your dough to the fridge. It can stay there for up to 24 hours, until you're ready to make pizza.
I really, really love dough that's flexible! If your dinner plans change, or something comes up, just pop the dough in the fridge and try again tomorrow!
The toppings
Use whatever pizza toppings you like here! I usually do pepperoni because that's what we have on hand and is a general crowd pleaser.

I do recommend layering half the cheese on the dough before you put the sauce on. Since the dough here is so thick, and home ovens can only go so high, the dough takes longer to bake. If you have sauce directly on the dough, you might be left with the dreaded gum line. The best way I've found to prevent this is by creating a cheese barrier.
Oh, and don't forget to sprinkle the cheese all the way to the edge of the pan! That's what will give you the amazing crusty cheese bites that are what dreams are made of.

Getting crispy crust
Two things that are most helpful in getting the crispy crust we know and love:
- Bake your pizza on the lowest rack possible in your oven. The lower, the better!
- Use a metal pan, and the darkest one you have.
I have this pan and love it, but if you want an even crispier crust, this darker pan would do the trick!


Detroit Style Pizza with Sourdough Crust
Ingredients
For the Dough
- 350 grams water
- 100 grams active sourdough starter
- 10 grams olive oil + 3 tablespoons for pan
- 500 grams all purpose flour OR bread flour
- 15 grams salt
For the Pizza
- 12 ounces shredded mozarella
- ½ cup pizza sauce
- Your favorite pizza toppings!
Directions
- Mix + knead the dough. Combine all ingredients in the bowl of a stand mixer fitted with the dough hook. Mix on low speed (no higher than 2) until combined, scraping down the sides of the bowl as needed. Once it's all combined, continue kneading for 5-7 minutes, until the dough begins to look smooth and stretchy. This is a very loose dough. It will look more like batter than regular bread dough - this is normal. Cover and rest for 30 minutes. Stretch and fold #1. Do one round of stretch and folds, cover and rest 30 minutes more. Stretch and fold #2. Do a second round of stretch and folds, then cover and rest for 30 minutes to relax the dough.Shape in pan + rise. Add 3 tablespoons olive oil to a 9x13-inch metal baking pan (the darker the metal, the better). Rub the oil all over the bottom and sides of the pan. Transfer the dough into the oiled pan and fold the edges inward to form a rectangle. Gently begin to coax the dough into the corners and edges - it likely won't stretch that far at this point and that's okay! Cover the pan with plastic wrap and rise at room temperature for 6-7 hours, until puffed up and bubbles begin to form on the top.With lightly oiled fingers, press the dough into the corners of the pan. At this point, you can proceed with making pizza, or cover and refrigerate your dough for up to 24 hours.Assemble pizza + bake. Preheat oven to 450 degrees. To assemble pizza, sprinkle half the cheese over the surface of the dough - making sure it goes all the way to the edges for those delicious crispy bites. Then cover with sauce, more cheese, and toppings. Bake on the lowest oven rack for 25 minutes, until the crust is deeply browned around the edges. If you want your toppings more browned, move to the top rack under the broiler for 1-2 minutes. Immediately run a knife around the perimeter of the pan to loosen the pizza, then carefully slide it onto a cutting board. If you let the pizza cool in the pan, it will cement itself to the sides and bottom and be extremely hard to get out. Allow to cool for a few minutes before slicing and eating.
Nutrition
If you want more sourdough pizza, be sure to check out this pizza crust with discard - the recipe that inspired this entires site!


Cindy says
Can I use 00 pizza flour?
mandyjackson says
I’ve not made this recipe using 00 flour, but can’t think of any reason why it wouldn’t work - would love to hear how it goes for you!
Hannah says
I love this recipe! I made it and it was heavenly! I think putting down a thick layer of cheese between the dough and the sauce is key to keeping the dough dry so to speak. This was honestly the best homemade pizza recipe and it's been on rotation in my house for a few weeks now.
Tonia says
I made this tonight for dinner. I'm new to sourdough. I'm never convinced that my starter is really alive and will work, and that I'm doing it right.
I followed the instructions in faith that this loose, kind of runny dough would turn into a decent pan pizza. BUT... it did!
The recipe is trustworthy. My starter performed beautifully. In fact, we thought it was too much bread for our liking. I'll cut the recipe in half next time. And my husband wants more toppings. The topping to crust ratio was off. My crust was almost 2" thick. More sauce and more toppings would have made it perfect.
I'm definitely trying this one again.
Thanks for sharing it!
Laura Lawrence says
Would a cast iron pan do the same job?
mandyjackson says
I think a cast iron would give you great crust and browning - My only concern would be letting the dough proof in it for as long as is called for in this recipe. If you try it, I would bake immediately after the second rise. Would love to hear how it works if you give it a go!
Cynthia says
I used a cast iron skillet and it came out amazing!
Elise says
Does NOT disappoint. 10/10 recommend!
Erica says
Is it 6 servings or 8?
mandyjackson says
It’s 8 slices of pizza, which I say is 6 servings assuming some people will want more than one piece.
Cassie says
Loveeee this recipe!
If I wanted to freeze the dough, would I do it before putting it in the pan? And then let it come to room temperature in a pan?
mandyjackson says
Hi Cassie! I've never frozen this dough so I honestly can't tell you how it would go, but yes, I think it would be best to freeze it before putting it in the pan. I'd be curious to hear how it works if you try it!
Heather Stanley says
My pizza looked exactly like your picture. Only problem the bottom was soggy. It was looked through but not crispy on the bottom. Any tips?
mandyjackson says
The most important factors for getting a crispy crust on the bottom are baking on the lowest rack in your oven, and using the darkest metal pan you have - they actually sell pans specifically for Detroit style pizza if you want to go down that road. I just use the USA pan (linked in the post) that I already have. Hope it’s crispier next time - that’s the best part!!
Arlene says
This is one of our favorites now!! I used my glass pan which worked great, dough was nice and crispy the trick is plenty of oil so dough “fry’s” in it. I added lots of cheese and sauce. The dough is actually airy it’s so delicious
Thank you
mandyjackson says
Love to hear this! Thanks for these tips - good to know about the glass pan!
Michelle says
Made this pizza a few weeks ago and sent pics to our family. It was delicious! They have now requested it for Christmas dinner. I am going to make it on Christmas Eve and refrigerate. We have an hour and 15 minute drive to get to my mom’s house where we are cooking (and eating). Will the dough be okay if left out of the refrigerator for the drive? We can assemble the toppings and cook as soon as we get there.
mandyjackson says
Yes! That sounds like a great plan - what a fun Christmas dinner!
Gina says
Can I do this without a stand mixer?
mandyjackson says
Hi Gina - I’ve never tried this without a mixer, but I imagine if you do 1-2 extra rounds of stretch and folds, it’ll work just fine 🙂
Cynthia Bailey says
I've been craving Detroit style pizza and was happy to come across this one. A truly fantastic and easy recipe. I made a homemade pizza sauce too. Delicious! Everyone loved it!
Angela says
This is my go-to pizza crust! I like to switch up the toppings though. Tonight was pesto, shredded chicken and sun dried tomatoes with mozzarella 🤤
I also layer cheese in the middle.
Gabrielle says
This was fantastic! Can I use a 12 inch round pan instead? Would the recipe need to be changed at all?
mandyjackson says
Hi Gabrielle - The crust will be slightly thicker in a 12" round pan, but if you're okay with that, it should work just fine as written 🙂
Johanna says
Can't wait to try this! I used to make Detroit style pizza all the time, but never with active starter. FYI...if I had to bet, the secret ingredient is to grease the pan with bacon grease! Try it and tell me I'm wrong?!
Maggie says
I did the second rise in the fridge because of timing and it still came out delicious! Helping heal my midwestern heart who is away from home!
mandyjackson says
Love this <3
Jo says
Pretty sure the "secret" is to grease the pan with bacon grease.
Laura says
Hi ~ just found your recipe and can’t wait to try it! I’m wondering if it would work to par bake the crust, then add toppings and continue baking to avoid underbaked dough? I think I will give it a try. Thanks for sharing your great recipe!!
Denise says
Anyone tried using a pizza stone to get the bottom crisp?
Gail says
I wondered how much the pizza dough should rise before adding the toppings? I did 2 rises. 6 hrs. at room temperature and then put it in the refrigerator. It has been in the refrigerator for over 12 hours and it has not risen much. Is this how it should be? My starter was very active. Used it at its peak.
Mandy says
There won’t be much visible rise in the fridge - that’s okay, it’s ready to use!
Christy says
Do you think I could halve the recipe? It’s just two of us and don’t want a bunch leftover! Also then if I spread it out thinner maybe it would be a little thinner?
mandyjackson says
Hi Christy - I have never halved this recipe but I think it would work great! I’d use a slightly smaller pan if you’re wanting a thinner crust.
Cali Reeves says
This came out perfect. My dough rose too be pretty thick (about 2"), but it was perfectly crispy on the bottom and edges and so soft and airy in the middle. My family loved it! Thank you so much for sharing.
Cara says
This tasted amazing but it took like 40 minutes and still was a little doughy in the center. I’ve tried several times now. I’m using the same USA pan, baking on the lowest rack. We’ve baked in our neighbors oven thinking it was the oven lol. We are trying again tomorrow. Have you ever tried par baking before adding cheese and sauce?
mandyjackson says
Hi Cara! That is so strange! I’ve not had that issue and I’ve made this pizza many times - I wonder if your oven isn’t quite getting to 450. It might be worthwhile to get an oven thermometer. I’ve never parbaked this since it bakes so quickly for me, but it could help if it’s taking 40+ minutes!
Emily G says
Do you let the pizza dough come to room temperature after it goes in the fridge overnight before doing toppings and baking or is cold better?
mandyjackson says
No need to let it come to room temperature - you can bake it cold.
Sheryl Poe says
This is absolutely amazing!! This is exactly like the old pizza huts pan pizza from back in the 80’s!! It turns out perfect every single time
I make it for everyone and everyone loves it !!
Heather says
Have you every doubled the recipe then split into 2 pans? I am making this now and wanted to follow exact before trying. I can't wait for tomorrow when I bake!!
mandyjackson says
I haven’t but I think it’d work as long as you like a thinner crust! You’ll want to shorten the bake time by 5-10 minutes I’m guessing 🙂
Monica says
Is the continued kneading for 5 to 7 minutes by hand or still in the stand mixer?
mandyjackson says
Stand mixer!
Carrie says
Detroit style pizza is sauce on top, it does make a difference. Also, consider altering for cheese blends… Brick cheese
Joelle Cripps says
Can I use a glass dish?
Gina Armenini says
I tried this today. Total disaster. I had such high hopes after reading the comments. I followed the directions exactly. It stuck horribly to the pan and ruined my pan. I even took it out of the oven at 20 minutes since it looked done and temp wise was. I tried immediately to remove it from the pan and it was stuck like glue. I was very generous with the olive oil. Lesson learned. I will never use anything but my cast iron skillet.
Mandy says
Gina, I’m so sorry this happened to you!! Would you mind sharing what type of pan you used? I’d like to add a note to the post to avoid whatever it is so this doesn’t happen to anyone else!
Gina Armenini says
Sure, it was a dark 9x13 cake pan. I took a picture of the pan after but not sure how to attach it.
Donna Steele says
Amazing pizza. The crust was a dream. We will definitely be making this again soon.
Shannon says
This had to be the absolute best pizza I have ever had! That crust was absolutely amazing! Since my oven tends to make things super dark on the bottom, I used the second from lower rack and par baked it @400 before topping and baking per your instructions and whew. My hubby prefers thin crust and even he was amazed he said wow it was light and airy! Highly suggest trying this recipe!!
Gail says
How much did your dough rise before you par baked it? I let mine sit at room temperature for 6 hours and then put it in the refrigerator. It has now been 15 hours and it has not risen much.
dawn m prieskorn says
This was great pizza dough - next time I will cut in half was very thick. So delicious!
Gail says
Very good. Used bread flour. Added 1/4 t. Citric acid to dough to make more sour. Make 100% hydration for starter. Left dough on counter 6 hours and then put in refrigerator. Next day it hadn’t risen much so put the dough in my proof setting on my oven until dough rose and had bubbles. Put back in refrigerator overnight and didn’t bake it until evening. Toppings included sausage, Canadian bacon, turkey pepperoni, (bell pepper, onion, mushrooms- partially cooked in MW), black olives along with mozzarella and Parmesan cheese. 3/4-1 cup pizza sauce. Could use more of each topping next time. Pizza came out of pan very easily. I used 2 T oil instead of 3. Might try 1 T next time. A little more bread than we like. Next time maybe cut in half. Makes 8 generous servings.
Sarah says
Taste was great! I followed the directions exactly and it was fully cooked by the 25 minute mark. It did stick to the bottom of the pan despite using the recommended oil amount. I was able to slide a metal spatula under it after releasing the sides with a knife and gently lift it around the whole thing until it released without tearing the dough. I’m not sure why this would happen as the dough was crispy on the bottom and fully cooked!
Mandy says
That’s funny - I made this focaccia yesterday in a different pan than usual and had the exact same problem! I am stumped about how it can stick with so much oil… Glad you could get it out!
Peggy says
This crust was amazing! Followed the recipe exactly and it came out perfect.