

Star bread is a really fun and festive bread for this time of year! A soft and slightly sweet dough layered with chocolate-cinnamon-brown sugar filling and shaped into a lovely star.
This recipe uses a sweet dough that I love because it's easy to make (no mixer required!) and easy to work with. Plus, I've fine-tuned the method to be so simple and fun to make!

Would you believe me if I told you I've been workshopping this recipe for over 2 years? And here at long last is the final version that I am SO excited to share with you!
The dough recipe has been majorly simplified to give you a soft, fluffy, slightly sweet bread that doesn't even require a mixer to make!
And the method for assembling this is the easiest and most fool-proof I've ever seen. It is so fun to make!

Let's get to it...
The dough
This dough is so simple to make - just your regular sourdough cast of characters of water, starter, flour, and salt, plus it's enriched with a touch of butter and an egg, and sweetened just the slightest bit with sugar.
The result is a bread dough that's easy to work with, and produces a soft and fluffy end product. So good!

Mixing
I don't find it worthwhile to knead this dough - the gluten has plenty of time to develop during the long rise. But you WILL need to mix it very well. You can do this with a mixer or use a fork/your hands (which is what I do).
Once the dough is mixed, scrape down the sides of the bowl, cover, and let it rest for 45 minutes. This will give the dough a chance to relax. Then, come back and do a round of stretch and folds all the way around the bowl. And that's all you need to do to mix this up - next, you'll let it rise at room temperature for 6-8 hours, until it's doubled in size.


How to Make Star Bread
My trick here is to start with small rounds of dough when assembling, then roll the full stack out to the size you want.
Every recipe I've ever seen for star bread has you roll each layer of dough out to the full 10-12 inches, then spread each one with your filling.
This takes up a ton of space while you're working, results in circles that are slightly different sizes and a pain to work with. Plus, spreading the filling on thin pieces of dough is very likely to result in tearing. Not fun!
Assembling the layers
Here, you're going to assemble your stack of dough and filling using small circles of dough. It will all be sealed up, with the filling neatly sandwiched between each layer. Then, you'll roll the whole stack out to the full size. It is SO much easier this way!
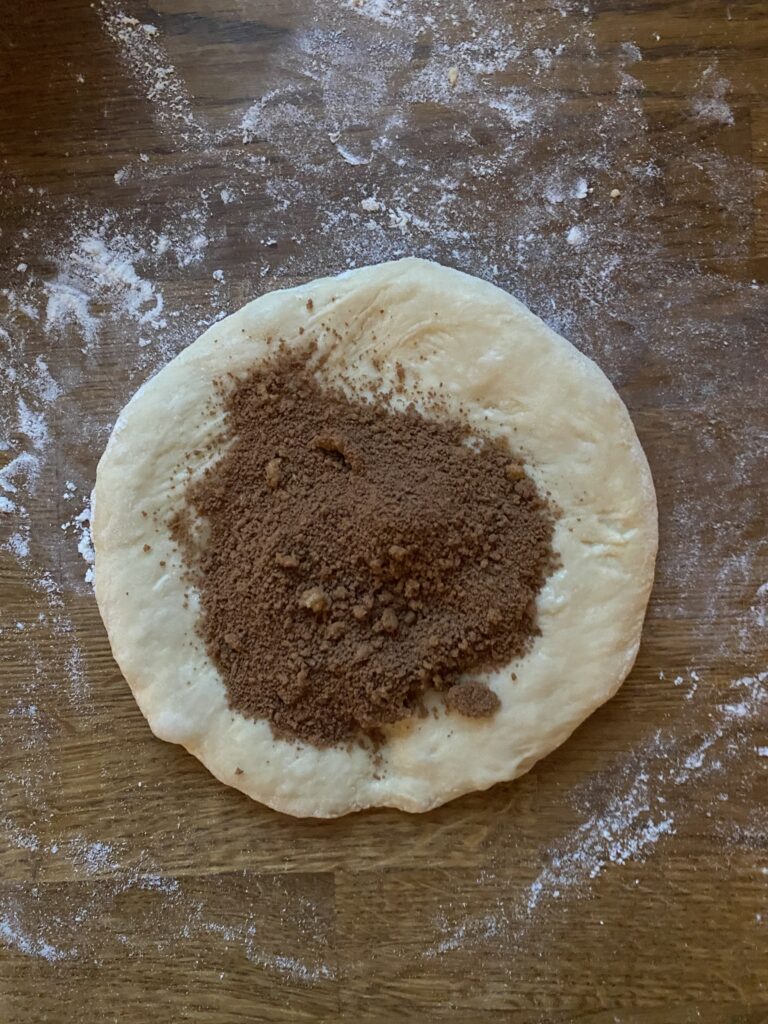
Start by gently rolling out one ball of dough. You'll want it to be a roughly 7-inch round.
Brush the surface of the dough with water (I use my hands for this), and sprinkle with ⅓ of your filling mixture. Be sure to leave a ½-inch boarder uncovered so your layers can seal well.
Then, take the second ball of dough and roll it out. You want it to be roughly the same size as the first round. You can pick it up and stretch it if needed. Then, layer it over top of the first round, stretching and shaping it to stack nicely. Brush it with water and sprinkle with the filling. Repeat this again with the third dough ball, top it with the remainder of the filling, and then cover it with the final piece of dough.


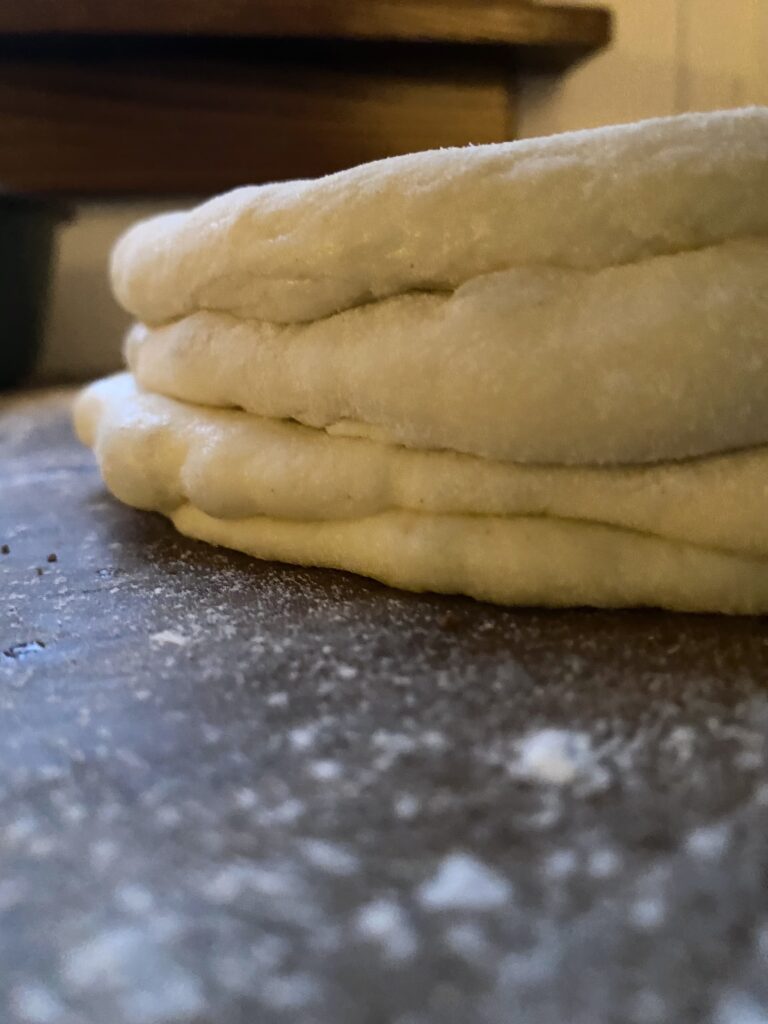
You'll have a nice stack of dough, with the filling neatly sandwiched between each layer.
Next, roll the stack out to a 10-inch round.
Making the star
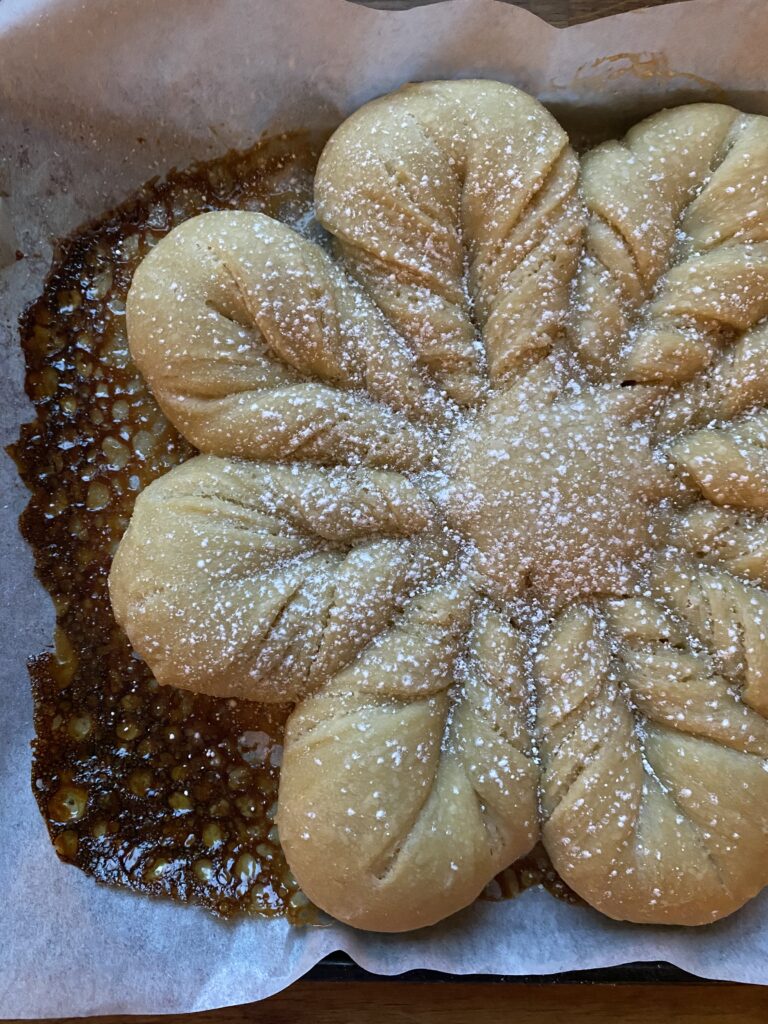
Once your stack of dough and filling is rolled out to a 10-inch round, transfer it to a piece of parchment paper.
You're going to make 16 tails to form into 8 arms of the star. I'm including lots of photos and a video of how to do this, because I think the visuals make it much easier to understand. It's simple once you see how to do it.
Use a small cup or bowl to make a light indentation in the center of the dough - this will be the center of your star. Using your bench scraper, cut four slices evenly around the circle. They'll be at the 15-minute marks if you were looking at a clock.
Then, cut another four slices between the first four. Aim to cut each piece of dough perfectly down the center. You'll now have a total of 8 tails.
Go around the circle one last time cutting each tail of dough in half. You will now have 16 tails.


Taking two adjacent tails at a time, grab one in each hand, lift them off the parchment paper and stretch them slightly. Then, turn them away from each other. Do three rotations, then pinch the ends together. I like to take the top point of the arm and tuck it under the bottom for a cleaner seam. Continue all the way around the star.
As an optional step, to emphasize the center star more, take a pair of kitchen shears and snip slightly further into the center at the point where each arm splits.

Baking (and an overnight option)
You can bake this immediately after it's shaped, OR cover it well with plastic wrap, refrigerate overnight, and bake straight from the fridge in the morning. Both work very well!
The filling
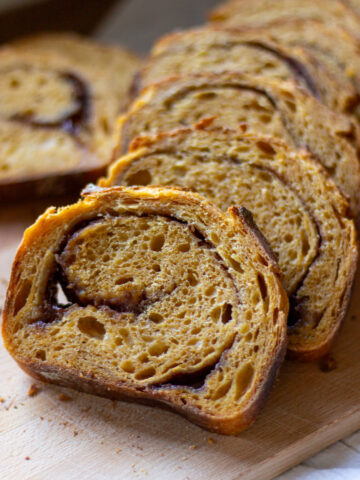
My favorite filling for this (so far) is the one listed in the recipe - cinnamon, cocoa powder, and brown sugar. It's like a cinnamon roll meets a chocolate babka. So good!
But one of the most fun things about this bread is you have so many filling options! I've done almond, Nutella, chocolate chips. You can also do savory fillings like pesto and mozzarella cheese.
If you're doing a wet filling (like a Nutella or pesto or jam), you can skip the step of wetting the surface of each dough round.
Leakage - You will have some leakage with the filling here - there's no way around it. But think of it as a feature, not a bug. Have you ever been upset that the bottom of your cinnamon roll had liquefied brown sugar on it?? Me neither! This is like sticky bun on the bottom, show stopping babka-esque star bread on the top.
I actually reduced the amount of brown sugar in the filling for the written recipe, so there's not a ton of leakage. If you want more (because, I think it really can be a feature!), increase the brown sugar to ⅓ cup.
A note about color - what makes this bread so visually striking is the contrast between the filling and the dough, so you'll usually see it with a darker filling. But I think a monochromatic filling can be just as pretty - especially with a sprinkle of powdered sugar!

Tips
- One of the keys to having a really nice looking star bread is sealing up the edges. Be sure to leave a good perimeter when making your dough stack so the edges stay clean.
- Roll the dough stack out to a 10-inch round before shaping. This is slightly smaller than you want the finished product to be (it should be around 12-inches when done). The dough will get stretched as you shape it, which makes up for the difference. Avoid rolling it too thin, which can cause tearing or loss of filling.
- Mistakes can be covered up with powdered sugar 🙂 I also don't think frosting is a bad idea here AT ALL. If you want to go that route, here is my go-to frosting recipe for sweet breads.
- This isn't necessarily a hard bread to make, but it does take a bit to get the hang of. I highly recommend watching the video in this post for a visual!
- Serve this warm. It is unbelievably soft when it's fresh from the oven! I let it cool for a quick 10 minutes to let the filling set, then sprinkle with powdered sugar and dig in! Any leftovers should be reheated for optimal softness.
This bread is always so fun and impressive, and will be the star of the show (pun absolutely intended) at any brunch, lunch, dinner, breakfast, or potluck you have it at!

Sourdough Star Bread
Ingredients
- 2 tablespoons (28 grams) unsalted butter, melted
- 150 grams water
- 100 grams active sourdough starter
- 1 large egg
- 24 grams sugar
- 325 grams all purpose flour
- 8 grams salt
For the Filling
- ¼ cup packed brown sugar
- 1 tablespoon cocoa powder
- 2 teaspoons cinnamon
- For dusting: powdered sugar (optional)
Directions
Make the Dough
- In a large bowl, combine the butter, water, starter, egg, and sugar. Add the flour and salt and mix until well combined. Scrape down the sides of the bowl, cover, and let rest for 45 minutes.With a moistened hand, do a round of stretch and folds to form the dough into a nice round. Cover and let rise for 6-8 hours, until doubled in size.
Make the Dough Stack
- Turn the dough out onto a lightly floured surface and divide into 4 roughly equal parts. Form each into a ball and let rest for 5 minutes. Meanwhile, preheat the oven to 350 degrees. Grab a baking sheet and a piece of parchment paper and set aside. Prepare the filling by combining the brown sugar, cocoa powder, and cinnamon in a medium bowl.Take one ball of dough and roll it into a roughly 7-inch round on a lightly floured work surface. Add flour as needed to prevent sticking. You can also pick it up and stretch it to get it into the shape you want. When you're happy with the size and shape, place it on your work surface, wet your fingertips with water, and run them along the top of the dough. Sprinkle with ⅓ of the filling mixture, leaving a ½-inch boarder along the perimeter of the circle. Set aside.Begin rolling another ball of dough into a 7-inch round. You want it to be the same size as the first one. Place it on top of the first round, sandwiching the filling between the two layers. You can stretch it as needed to met the edges of the first layer. Wet your fingertips again and moisten the top of the newest layer, then sprinkle with ½ of the remaining filling. Remember to leave a boarder uncovered so the next layer of dough can stick.Repeat this with the remaining two pieces of dough, using the last of the filling between them. When you're done, you'll have a high stack of dough, with no filling showing between layers.Take the stack and place it on a lightly floured surface. Flour the top and roll into a roughly 10-inch circle. You can flip the dough over, and turn it as needed to get a nice circle. Transfer the dough to a piece of parchment paper.
Shape the Star + Bake
- Place a small round glass or bowl into the center of the assembled dough and press lightly to indent. Using a bench scraper, make four slices evenly around the circle from the perimeter of the circle inward, stopping when you get to your mark. You should have even "15-minute" marks around your circle. Make four more cuts, spaced evenly between the first round of cuts. Cut each piece of dough in half again, being sure to stop at the indented circle. You will now have 16 tails on your dough circle.Grab two adjacent pieces of dough and twist them away from each other. Make three rotations, then pinch the ends together to seal. I like to tuck the top of the point under the bottom to seal it well. Do this all the way around the circle. If you want to emphasize the center star, you can take a pair of kitchen shears and snip the base of each point roughly ½-inch inward. Carefully transfer the parchment paper onto the baking sheet. (If you want to bake later, you can cover very well with plastic wrap and place in the fridge at this point.)Bake for 25-30 minutes, until baked through and browned to your liking. If the points of the star are browning too quickly, tent them with foil. Cool for 10 minutes, then dust with powdered sugar and enjoy warm.
Video
Notes
Nutrition


Leave a Reply